 Build
Quick Answer: How to Install n8n on Hostinger VPS
You can install n8n on a Hostinger VPS using a preconfigured Docker template, without manually installing Docker or entering terminal commands. Hostinger provides an n8n application template that handles the initial deployment, including a Docker container and a Traefik reverse proxy for HTTPS access.
We tested this process on October 18, 2026, using a Hostinger KVM 1 VPS. Our n8n instance was ready in approximately two minutes, although Hostinger's setup screen estimated around five minutes.
After installation, we built a working Telegram AI Sales Assistant using n8n, Google Gemini, and Telegram. The bot answered questions about a demo agency's website packages and remembered the conversation within each Telegram chat.
👉 See Hostinger VPS plans with the n8n template (KVM 1 was $6.49/mo on 24 months when we checked).
This tutorial covers the exact setup we followed, the Docker template we selected, the Telegram automation we built, and the problems we encountered along the way.
What You Need Before Starting
You do not need to be an experienced server administrator to follow this installation method. However, you should have the following ready:
- A Hostinger VPS: We used KVM 1 with 1 vCPU, 4 GB RAM, 50 GB NVMe storage, and 4 TB bandwidth.
- A Hostinger account: Required to purchase the VPS and access hPanel.
- An email address: Used when creating your n8n owner account.
- A timezone: Choose the timezone that matches how you want scheduled workflows to run.
- A Telegram bot token: Needed for the example automation. You can obtain one from BotFather on Telegram.
- A Google Gemini API key: Needed to connect the AI model through Google AI Studio.
- A password manager: Recommended for securely storing your n8n owner password.
If your goal is only to install n8n, you can stop after Step 6. The Telegram bot is an additional practical example demonstrating what you can build after deployment.
n8n Hosting Requirements (Official, Checked November 5, 2026)
Before you pick a server, here is what n8n's own documentation asks for, next to what worked for us:
| Requirement | What n8n's docs say | What we used |
|---|---|---|
| Install method | Docker (recommended). The new one-line setup curl -fsSL https://get.n8n.io | sh needs Docker with the docker compose v2 plugin. | Hostinger's n8n Docker template (no commands) |
| Database | SQLite by default; PostgreSQL 17 or 18 (16 for compatibility) is optional. | The template's default |
| RAM | No fixed number. Memory use grows with data size, binary files, the number of nodes, Code nodes, manual runs and workflows running at the same time. | KVM 1: 1 vCPU, 4 GB RAM, 50 GB NVMe, worked fine for our bot |
| Skills | n8n recommends self-hosting for people who can set up, secure and scale servers. | The template handles setup; you still own updates and security |
Can you self-host n8n without Docker?
Only the old way, and not for long. n8n's docs say npm installs are deprecated from n8n 3.0, and that from 3.0 n8n is only distributed through Docker. Existing npm installs keep working for now, but new installs and future upgrades should use Docker. If you still use npm, n8n needs Node.js 20.19 to 24.x, n8n Assistant is not available, and after an out-of-memory crash you must restart n8n yourself (the Docker image restarts automatically).
That is why we used the Docker template: it gives you the recommended setup without typing a single Docker command. Shared web hosting can't run Docker, so for n8n you need a VPS (or n8n Cloud). Cost comparison: n8n self-hosted vs n8n Cloud.
Sources: n8n one-line setup · install with npm · choose n8n's database · fix memory issues.
Step 1: Choose a Hostinger VPS Plan
First, you need a VPS where n8n can run continuously. For our test, we purchased Hostinger KVM 1 on a 24-month term.
Here are the specifications and prices we recorded:
| Item | Hostinger KVM 1 |
|---|---|
| CPU | 1 vCPU |
| RAM | 4 GB |
| Storage | 50 GB NVMe |
| Bandwidth | 4 TB |
| Initial monthly rate | $6.49 |
| 24-month hosting total | $155.76 |
| Renewal rate | $11.99/month |
👉 Check today’s KVM 1 price in Hostinger’s cart
These were the US prices displayed on hostinger.com on October 27, 2026, before taxes. They are promotional prices and may change.
We also tested the coupon LEARN2EARN. Our checkout displayed approximately $5.84 per month after applying it. That was our observed cart price, not a guarantee that the coupon will remain available.
Hostinger also listed a free domain for one year and free weekly backups across its VPS plans at the time of our check.
To start:
- Visit Hostinger and find its VPS hosting plans.
- Select KVM 1 if its resources match your intended workload.
- Choose your billing period. We selected 24 months.
- Review the checkout price, renewal rate, and any applicable coupon.
- Complete the VPS purchase.
For more information about the provider before purchasing, see our Hostinger review.
Step 2: Choose Your VPS Server Location
After completing our purchase, Hostinger took us through the VPS setup process in hPanel.
The first decision was the server location. Hostinger displayed available data centers along with estimated latency information, helping us compare locations before deployment.
- Open the VPS setup process after purchasing your plan.
- Review the available server locations.
- Compare the latency displayed for each data center.
- Select the location that makes sense for your users and workflows.
- Continue to the installation selection screen.
For our deployment, we selected Germany - Frankfurt.
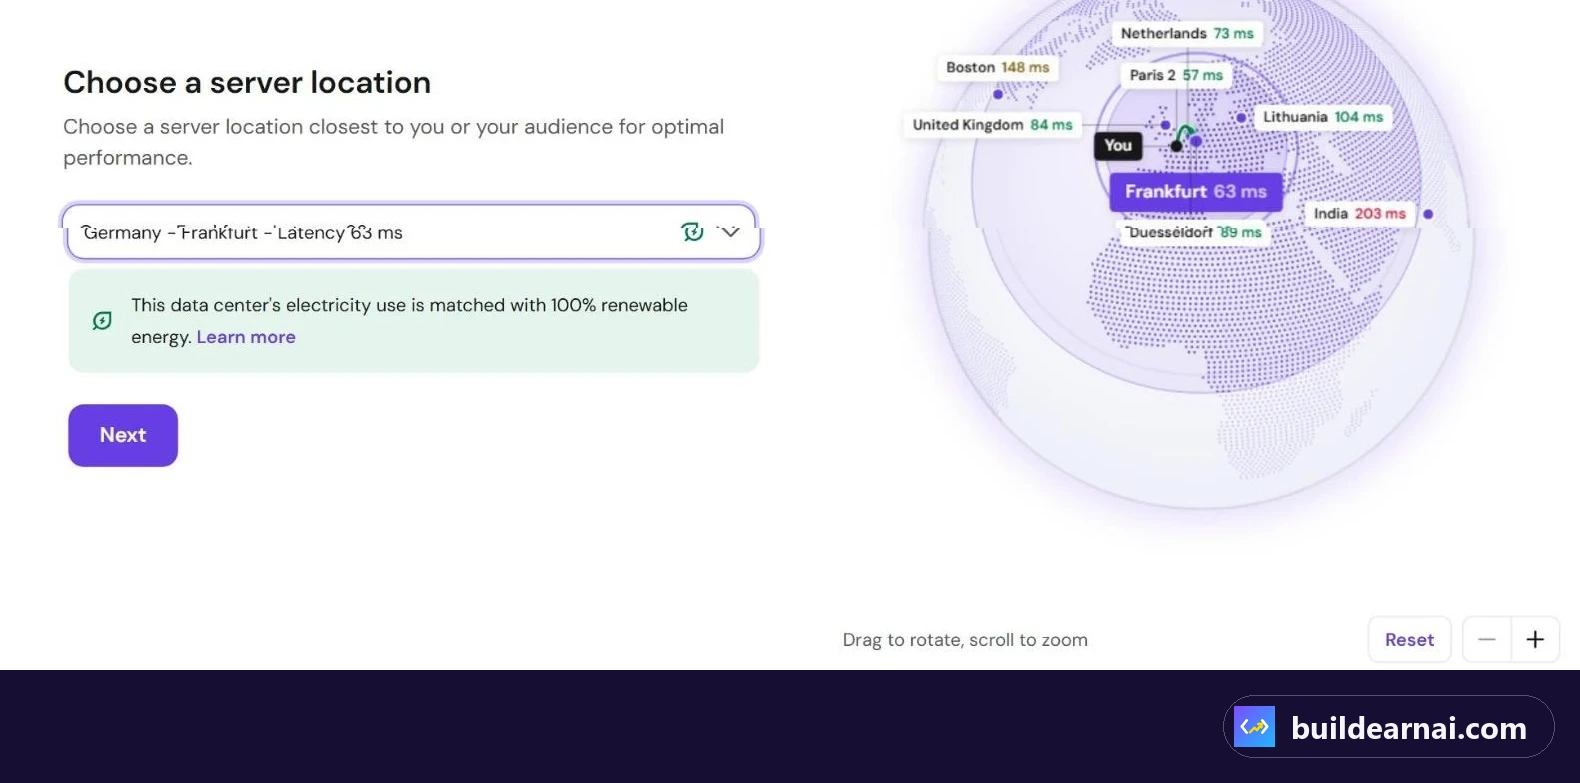
The location step shows the latency to each data center.
Server location matters because it affects the network distance between your VPS and the services communicating with it. However, the lowest displayed latency is not the only consideration. Think about where your users and connected services are located.
You do not need to choose Frankfurt specifically. It was simply the location we used for this tutorial.
Step 3: Select the n8n Docker Template
This is the most important part of the installation.
Instead of manually configuring an operating system, installing Docker, and deploying n8n ourselves, we used Hostinger's preconfigured application template.
- Find the Choose what to install screen.
- Review the three available tabs: Plain OS, Control panel, and Applications.
- Select Applications.
- Search for n8n.
- Review the available templates.
- Choose n8n - Installed using Docker.
- Click Select.

Searching "n8n" under Applications shows five templates.
During our setup, searching for n8n displayed five choices:
- n8n: Installed using Docker.
- n8n: Another template with the same basic application name.
- n8n (+100 workflows): A separately listed template.
- n8n (queue mode): A queue-mode option.
- n8n with AI Assistant: Another available application option.
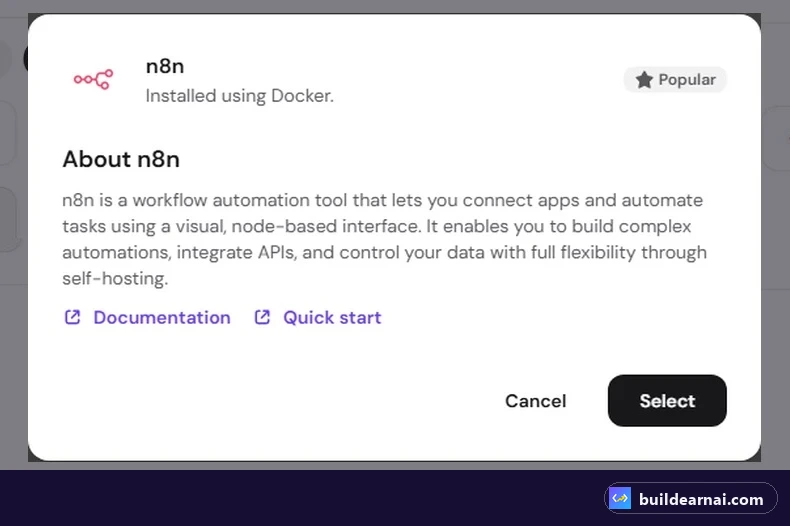
The template we used: n8n, installed using Docker.
For what each setting means after install, the official n8n documentation is the reference we used.
We deliberately selected the first Docker-based n8n template. This article documents that specific choice, not the configuration of the other templates.
For beginners who want to follow our example exactly, selecting the same template reduces the number of differences between your installation and ours.
It also means you do not need to follow a separate manual Docker installation tutorial for this initial deployment.
Step 4: Configure Your n8n Timezone and Deploy
After selecting our template, Hostinger displayed a page titled n8n configuration.
In our setup, this screen asked for only one setting: the timezone.
The timezone is important because n8n uses it for scheduled workflows. For example, if you later create an automation that runs at a particular local time, you want its schedule to match your intended timezone.
- Open the n8n configuration screen.
- Find the Timezone setting.
- Select your preferred timezone.
- Review your selection.
- Click Deploy.
We chose Europe/Berlin because our VPS deployment was based in Germany.
You can select a different timezone if your automation schedules should follow another region. Your preferred workflow timezone does not have to match the physical VPS location.
Once we clicked Deploy, Hostinger started preparing the n8n installation automatically.
Step 5: Wait for Deployment and Verify Docker Containers
After deployment started, Hostinger showed a screen labeled Setting up your n8n.
The screen explained that setup could take approximately five minutes and that Hostinger would send an email when the installation was ready.
In our October 18 test, the VPS was ready in approximately two minutes. Your deployment may take longer.
- Allow Hostinger to complete the initial setup.
- Check for the completion notification.
- Open hPanel and navigate to VPS > Docker Manager.
- Look for the n8n and Traefik Docker applications.
- Confirm that both applications show a running status.
- Use the Open link for n8n to access the application.
Our Docker Manager displayed two running applications:
- n8n: The automation platform where we created and managed workflows.
- traefik: The reverse proxy used in our deployment.
Each application had Open and Terminal links.
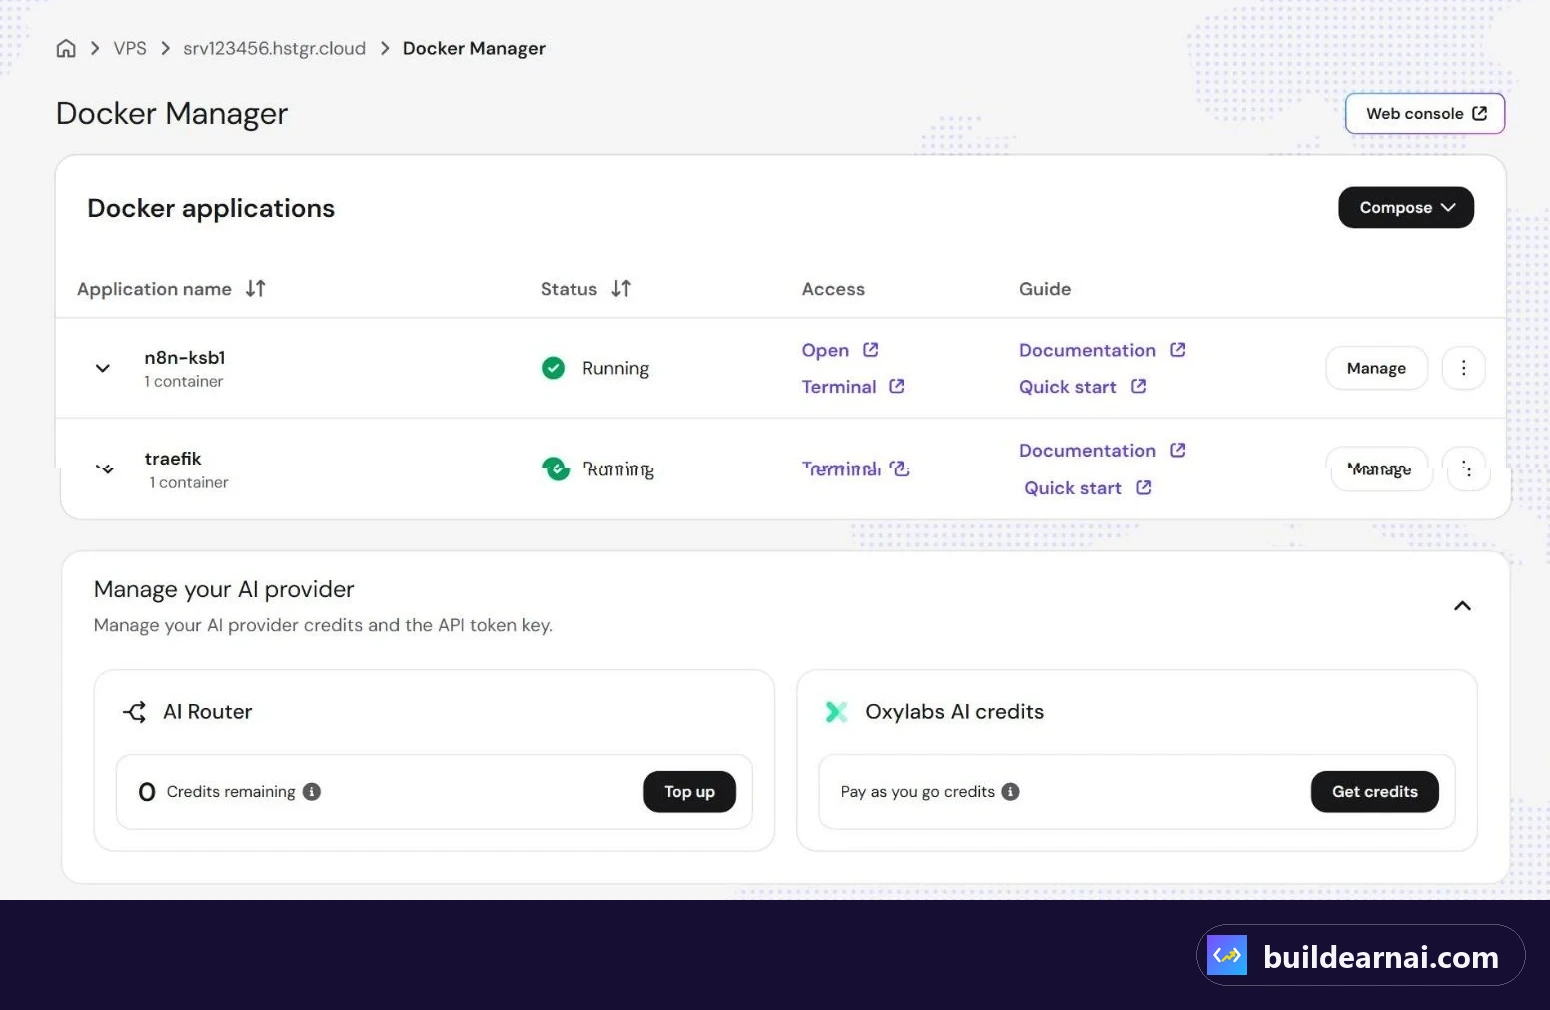
Docker Manager after the deploy: n8n and traefik both running (server name hidden).
When we opened n8n, it loaded through a Hostinger server hostname similar to srv123456.hstgr.cloud, using HTTPS.
The exact hostname will be different for your VPS. Use the address assigned to your installation rather than copying an example hostname.
At this stage, our n8n application was running without us having entered any terminal installation commands.
Step 6: Create Your n8n Owner Account
The first time we opened our new n8n installation, it displayed a page titled Set up owner account.
This is where you create the login for your own n8n workspace. The owner account is not something you should share with clients or publish in a tutorial.
- Open your new n8n URL.
- Enter your email address.
- Enter your first name and last name.
- Create a strong password.
- Complete the owner account setup.
- Store your login details securely.
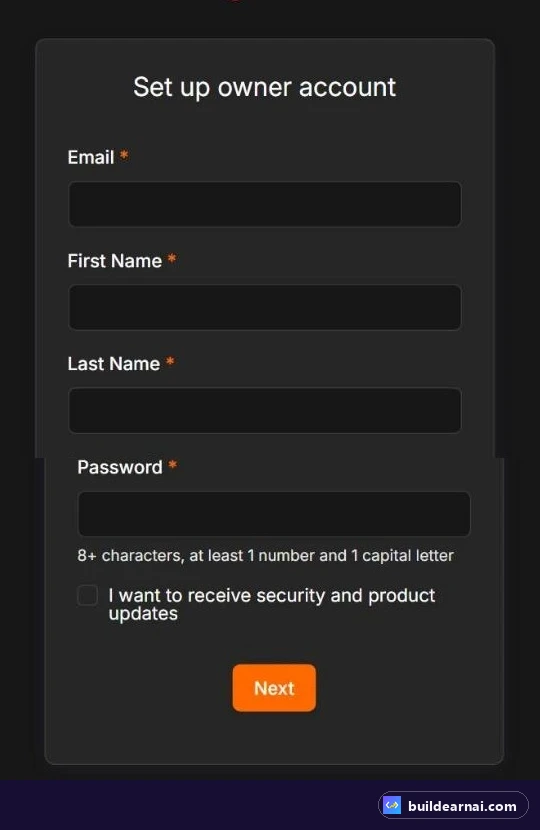
The first screen of a new n8n install. Fill it in yourself and keep the password private.
During our test, the password requirements were at least eight characters, one number, and one capital letter.
Meeting those minimum requirements does not automatically make a password strong. We recommend using a longer, unique password generated and saved by a password manager.
Do not include your owner password in screenshots, tutorial recordings, or messages shared with other people.
Once the owner account is configured, your self-hosted n8n instance is ready for creating workflows.
Build Your First Workflow: Telegram AI Sales Bot
After installing n8n, we wanted to test more than whether the interface opened. We built a functioning workflow called Telegram AI Sales Assistant for a demo web design agency.
The objective was simple: someone sends the agency's Telegram bot a message, an AI model generates a relevant response, and the bot sends that answer back to the same conversation.
The Workflow Structure
Our main workflow followed this sequence:
Telegram Trigger (On Message) -> AI Agent -> Telegram (Send a text message)
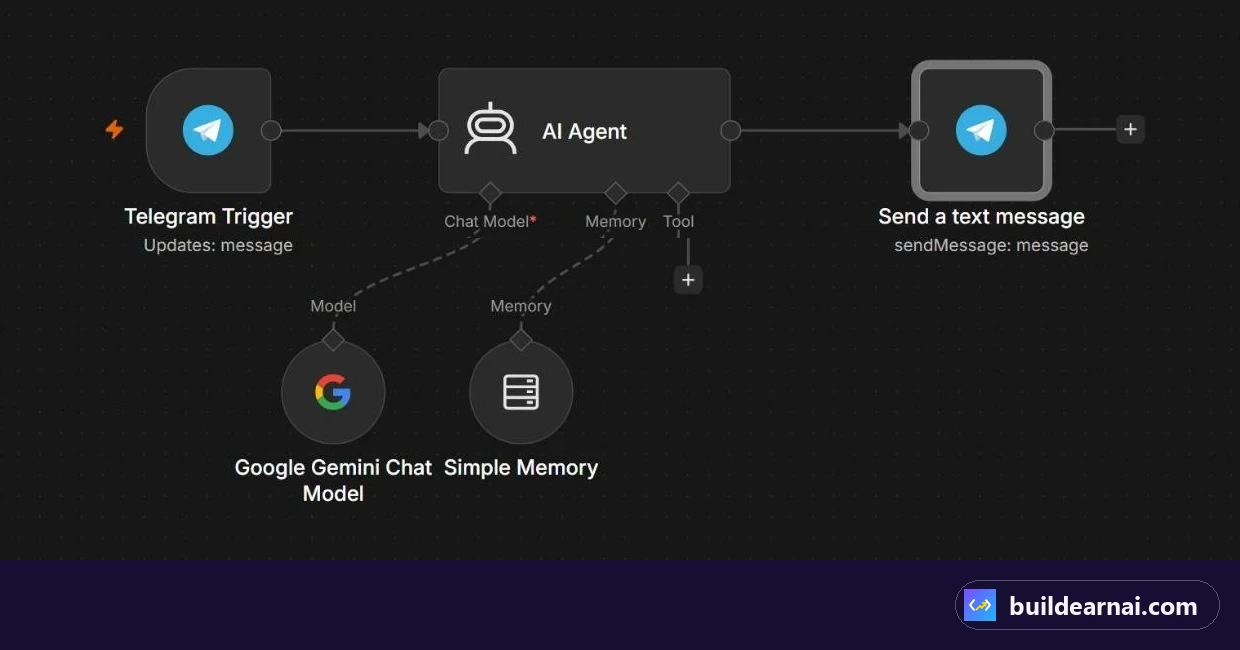
The finished workflow in n8n.
We also connected two components to the AI Agent: Google Gemini Chat Model and Simple Memory.
1. Create the Telegram Trigger
We began with a Telegram Trigger configured to react when the bot receives a message.
To connect it, we used a bot token obtained from BotFather on Telegram. The token was added through n8n credentials, rather than written directly into our workflow instructions.
This trigger provides the incoming message and Telegram chat information needed by the following nodes.
2. Configure the AI Agent
Next, we connected the Telegram Trigger to an AI Agent.
The AI Agent used the incoming Telegram message text as its prompt, meaning the customer could ask questions naturally rather than following fixed commands.
We also provided a system message describing the demo agency's services and prices:
| Service | Price |
|---|---|
| Starter | $950 |
| Business | $1,500 |
| Premium | $2,200 |
| Website care plan | $49/month |
These were demonstration prices, not Hostinger or n8n subscription prices.
The system message gave the AI relevant business information to use when responding to customers. We kept the configuration focused on answering questions about the agency's offerings.
3. Connect Google Gemini
We connected a Google Gemini Chat Model to the AI Agent and configured its credentials using a Gemini API key from Google AI Studio.
We initially selected gemini-2.5-flash, but our test returned a 404 error indicating that the model was no longer available to new users.
Switching the Gemini Chat Model node to a newer Flash model resolved the problem in our setup.
Model availability can change. Choose a model currently available to your own API account rather than assuming an older model identifier will work.
4. Add Conversation Memory
We connected Simple Memory to the AI Agent so that the bot could maintain conversational context.
Our configuration used:
- Session key: The incoming Telegram chat ID.
- Context window: 10.
Using the Telegram chat ID as the session key helped separate conversations by chat, rather than treating every incoming message as part of one shared conversation.
This is useful when a customer asks a follow-up question about a package discussed earlier.
5. Send the AI Response Back to Telegram
Finally, we connected a Telegram node configured with the Send a text message action.
We set it to return the AI-generated response to the same Telegram chat that originally sent the message.
The completed workflow could receive a customer question, process it through Gemini with the agency's system message, and send the result back through Telegram.
6. Test, Check Executions, and Publish
We tested the workflow by messaging the bot and checking its execution results in n8n.
Successful runs appeared in green in the Executions tab.
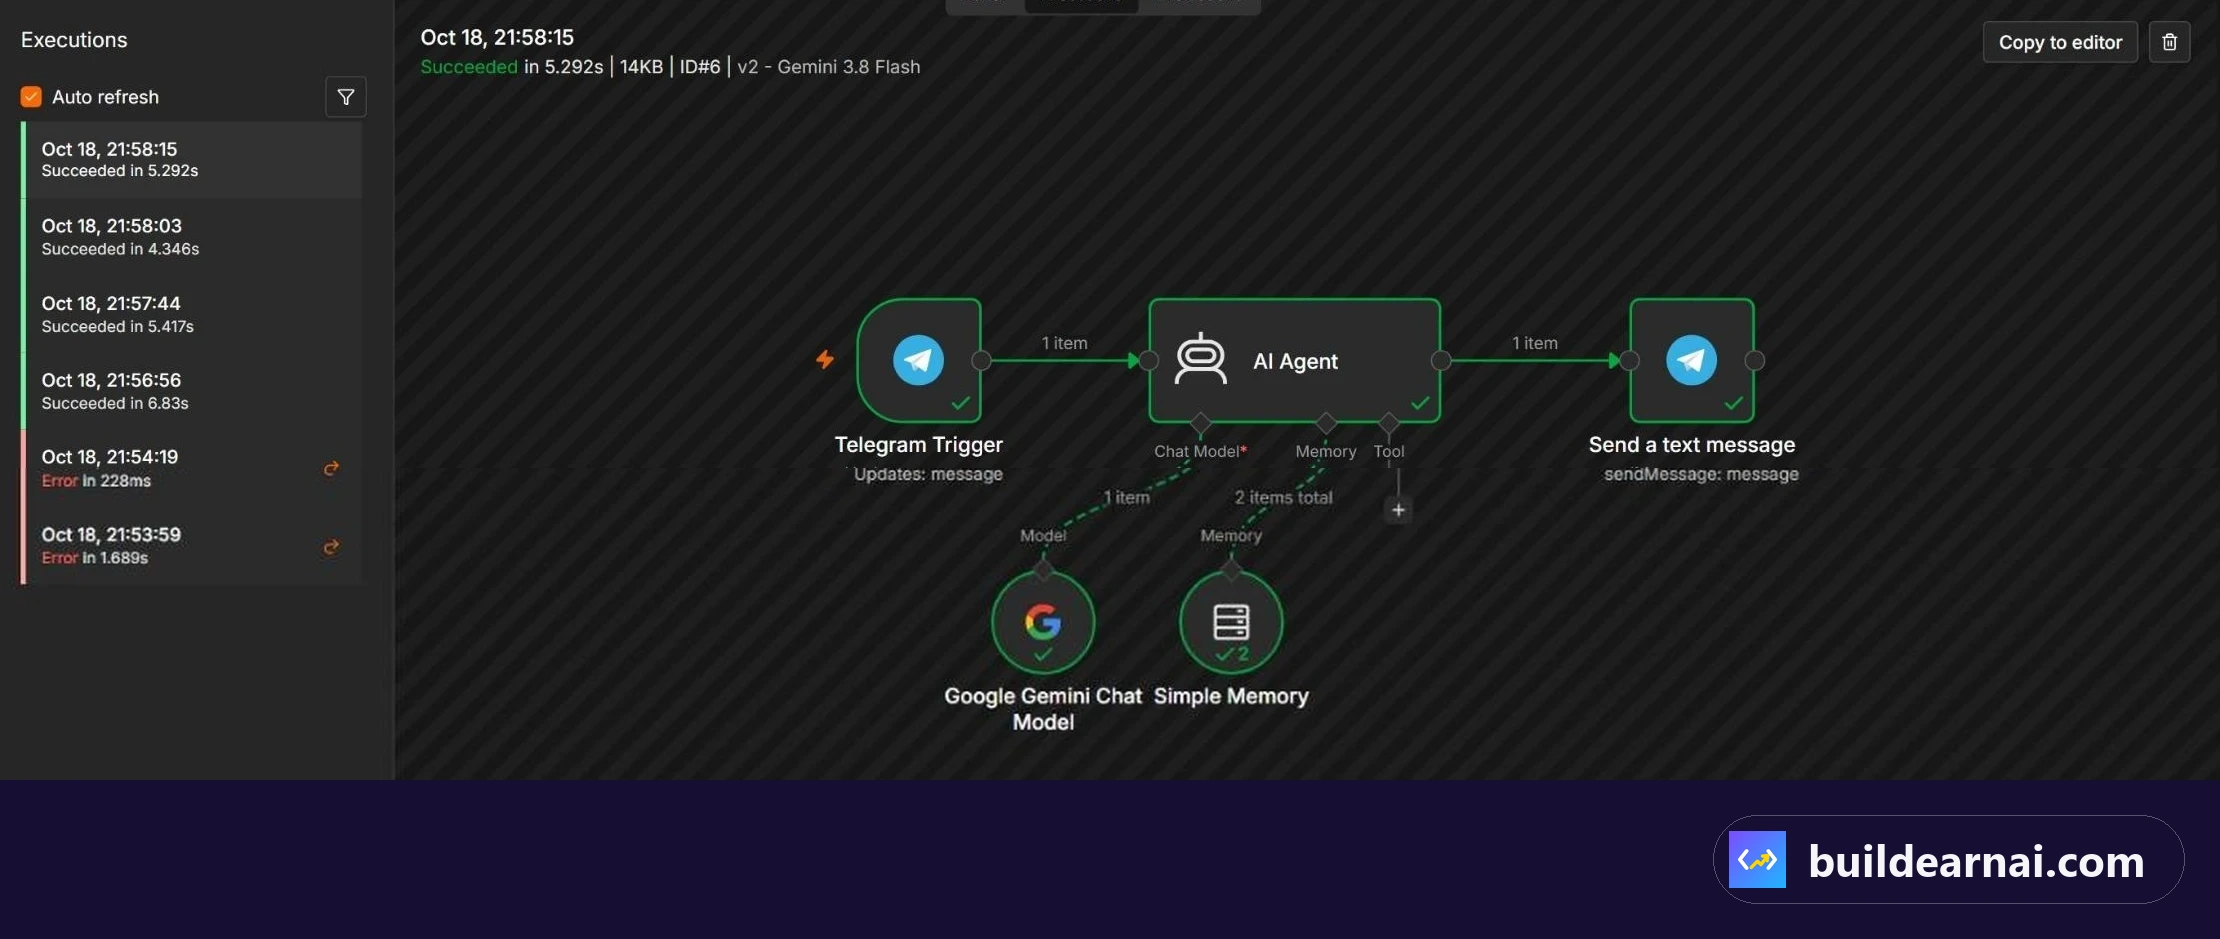
Executions: every node green on a successful run.
One important lesson from our testing: after editing the workflow, you must Publish or activate it for the Telegram trigger to run in production. A workflow that works during testing may not respond to new production messages if the updated workflow has not been published.
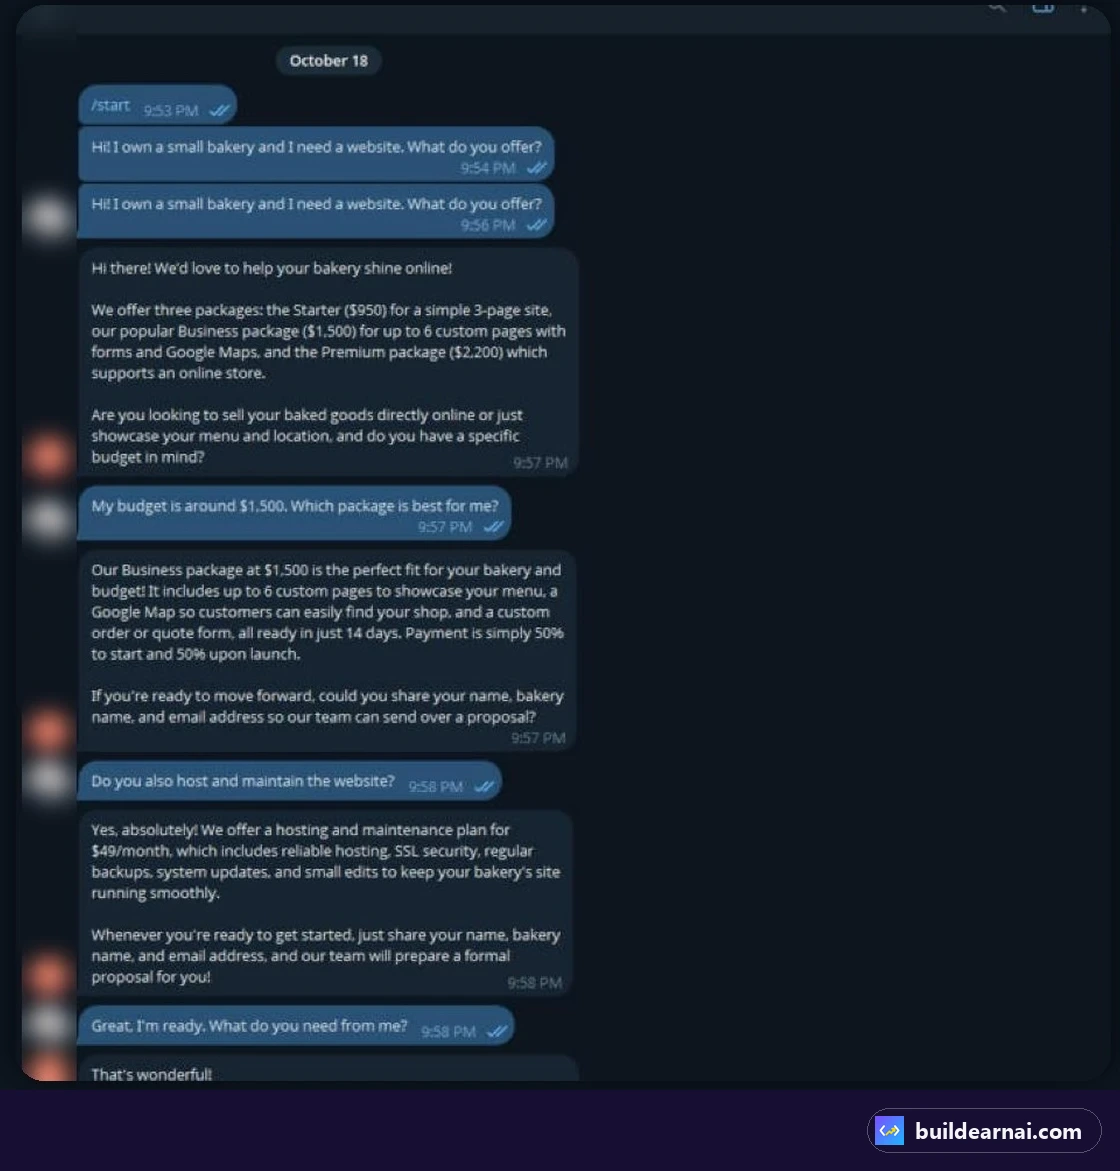
A real conversation with the bot (our test account is blurred).
For the complete demonstration, including the setup and bot creation, watch the full build.
Common Problems and Fixes
These are the issues we encountered or the checks we recommend for this particular installation.
| Problem | Cause | Fix |
|---|---|---|
| Gemini returns 404 | Selected model unavailable | Choose a currently available Flash model. |
| Telegram bot does not respond | Workflow not published | Publish or activate the updated workflow. |
| Forgot n8n owner password | Login credentials lost | Use a password manager. Recovery depends on your email setup. |
| n8n URL does not load after deployment | Deployment may still be completing | Wait a few minutes and check Docker Manager for Running status. |
If an automation fails, the Executions tab is a useful starting point for identifying which part of the workflow encountered the problem.
Do not copy credentials into support messages or public screenshots when investigating an error.
Is Hostinger KVM 1 Enough for n8n?
For our Telegram AI Sales Assistant, Hostinger KVM 1 worked fine. We successfully deployed n8n, connected Telegram and Gemini, and ran the example workflow.
However, one successful small workflow does not prove that KVM 1 is sufficient for every n8n installation.
Workloads involving many simultaneous workflows, heavier processing, queue mode, or local AI models may need additional RAM and CPU resources.
Our example used Google Gemini through an API. It was not a test of running a local AI model directly on the VPS.
If you expect to expand beyond lightweight automations, compare the available resources before committing to a plan. See our guide on which KVM plan to choose, or compare KVM 1 and KVM 2 on Hostinger.
Security Checklist for Self-Hosted n8n
Getting n8n running is only the first part of managing a self-hosted automation platform. You are also responsible for protecting your installation and maintaining it over time.
- Use a strong owner password: Make it unique and store it securely.
- Protect your API keys: Keep Telegram and Gemini tokens in n8n credentials, not hardcoded into node instructions.
- Check screenshots: Never expose passwords, tokens, or API keys in published tutorials.
- Keep software updated: Review updates for n8n and the components supporting your deployment.
- Maintain backups: Check the weekly backup offering and understand what your backups cover.
- Know your renewal: KVM 1 renews at $11.99/mo; we explain why that matters in the real cost of cheap hosting.
- Protect access: Do not share your owner login or grant unnecessary access to the installation.
- Test after changes: Verify that important workflows still run correctly after edits or updates.
Hostinger listed free weekly backups for its VPS plans during our price check, but you should not assume that the mere presence of a backup feature guarantees complete recovery of every workflow and credential.
Frequently Asked Questions
How can I run n8n locally?
Install Docker Desktop and run the official n8n image, or install it with npm, then open it in your browser. Move it to a VPS when it needs to run all the time.
How do I get started with n8n?
Start with one simple workflow (a trigger, one action, one message), then add an AI agent. Our Telegram AI agent on a Hostinger VPS is a good first project.
1. Can I install n8n on Hostinger VPS without using SSH commands?
Yes. In our test, we selected the n8n Docker application template in hPanel, chose a timezone, and clicked Deploy. The initial installation did not require us to enter SSH or Docker commands manually. Advanced maintenance may still require more technical knowledge.
2. Does the Hostinger n8n Docker template include HTTPS?
Our installation opened over HTTPS using the Hostinger-assigned server hostname. Docker Manager also displayed a running Traefik reverse proxy alongside n8n. This describes the deployment we tested; verify that your own installation opens securely before using it.
3. Can I build a Telegram AI bot using the Hostinger n8n template?
Yes. We built a Telegram AI Sales Assistant using Telegram Trigger, AI Agent, Google Gemini Chat Model, Simple Memory, and a Telegram message-sending node. It responded to incoming messages using information about our demo agency's services. You need your own Telegram bot token and Gemini API key.
4. Do I need a more powerful VPS for AI automation?
Not necessarily. KVM 1 handled our lightweight Telegram bot successfully because we used Gemini through an external API. More demanding workloads, multiple concurrent automations, queue mode, or local AI models can require more computing resources. Choose your VPS based on the workflows you actually plan to run rather than assuming that every AI automation requires a large server.
5. What are the minimum requirements to host n8n?
n8n's docs recommend Docker (with the docker compose v2 plugin) and use SQLite by default, with optional PostgreSQL. They give no fixed RAM number because memory depends on your workflows. Our Telegram AI bot ran fine on Hostinger KVM 1 (1 vCPU, 4 GB RAM).
6. Can I install n8n without Docker?
npm installs still work for existing setups, but n8n says they are deprecated from n8n 3.0 and that n8n is only distributed through Docker from 3.0 on. For a new install, use Docker or a VPS template like Hostinger's.
Final Thoughts
Installing n8n on Hostinger VPS was straightforward in our October 18, 2026 test. The Docker template removed several manual deployment steps, and the application was accessible through HTTPS shortly after setup.
Our biggest challenges came after installation: selecting a working Gemini model, connecting the Telegram conversation to the AI Agent, and making sure the finished workflow was published.
If you are starting with self-hosted automation, a small practical project like a Telegram sales assistant is a useful way to learn triggers, AI models, credentials, memory, and workflow execution.
Start with a simple workflow, confirm that it works reliably, protect your credentials, and monitor resource requirements as your automations become more complex.
Ready to set it up? Get a Hostinger VPS for n8n and use coupon LEARN2EARN at checkout.
Affiliate link: we may earn a commission at no extra cost to you. It does not change our tests or numbers.