 Build
Short answer: To deploy a PHP + MySQL app on shared hosting, create a subdomain, set up a MySQL database, upload your PHP files, and run the app's installer. We did exactly this with ReviewBoost, a small app built using the free version of Google Gemini, and got it working on Hostinger shared hosting without a VPS or Node.js server.
This guide shows how to deploy a PHP MySQL app on shared hosting using our real project, including the mistakes we encountered, the fixes we made, and the security checks we performed before sharing the link.
What We Built: ReviewBoost
ReviewBoost is a QR-based review funnel for local businesses. A customer scans a QR code, selects a rating from 1 to 5 stars, and can leave a Google review or submit optional private feedback. The business owner gets a dashboard for viewing feedback, changing settings, accessing the QR code, and exporting data as CSV.
We built the app with the free version of Google Gemini. Our first attempt to generate every file in one message produced an error, so we switched to asking Gemini for one file at a time.
The project started with six files:
app.php— Shared configuration and database helper.install.php— Browser-based installation wizard.index.php— Customer-facing review page.admin.php— Business owner dashboard.logout.php— Ends the owner's login session..htaccess— Apache configuration and access protection.
After testing locally, we deployed these files to a Hostinger Business shared hosting plan. The same basic deployment steps apply to the Premium and Unlimited plans in this example.
You can also watch our full ReviewBoost build video to see how we created and tested the project.
What You Need Before Starting
Use this checklist before uploading your app:
- A working PHP application: Your PHP files should already exist and be tested locally.
- A shared hosting account: We used Hostinger with its hPanel control panel.
- A domain: You can use a subdomain to keep the app separate from your main website.
- MySQL database access: Your hosting account must let you create a database and database user.
- A file manager: We used Hostinger's built-in File Manager.
- Database credentials: You'll need the database name, username, password, and host.
- An installation method: ReviewBoost uses
install.php. Other apps may require manual configuration.
If you haven't selected a hosting plan, start with our Hostinger Premium vs Unlimited comparison or read our Hostinger hosting review.
👉 Need a plan with PHP, MySQL and hPanel? See Hostinger’s shared hosting plans.
Before You Upload: Test Your PHP App Locally
Uploading an untested AI-generated app directly to a live website makes debugging harder. You won't immediately know whether a problem comes from the generated code, the hosting environment, or the database configuration.
We tested ReviewBoost locally using a temporary MariaDB database and PHP's built-in development server.
Start the PHP Development Server
Open a terminal in the folder containing your project files and run:
php -S localhost:8000
Then open http://localhost:8000 in your browser. Make sure your local database service is running and configure the app to connect to your temporary database.
The built-in server is useful for development. It is not intended to serve your public production website, and it does not enforce Apache .htaccess rules.
Check Every PHP File for Syntax Errors
Before uploading, run PHP's syntax checker on every PHP file:
php -l app.php
php -l install.php
php -l index.php
php -l admin.php
php -l logout.php
A successful syntax check reports that no syntax errors were detected. However, it does not prove that your database queries or application logic work correctly.
This step saved us trouble because Gemini-generated code needed manual corrections. In one case, Gemini's copy button merged two lines in install.php, causing a line of code to be swallowed by a comment.
We also corrected $e::getMessage() to $e->getMessage() and addressed a PHP 8.4 deprecation notice by supplying an explicit escape parameter to fputcsv() (see the PHP manual for fputcsv).
Our takeaway: AI can generate a useful starting point, but you still need to inspect, lint, and test its output.
Step 1: Create a Subdomain in Hostinger hPanel
For our project, we wanted ReviewBoost separate from the main website. Instead of placing its files at the root of the domain, we created a subdomain called reviews.
- Log in to your Hostinger hosting account.
- Open hPanel for the website you want to use.
- Navigate to Domains > Subdomains.
- Enter
reviewsas your subdomain name. - Create the subdomain and check its assigned folder.
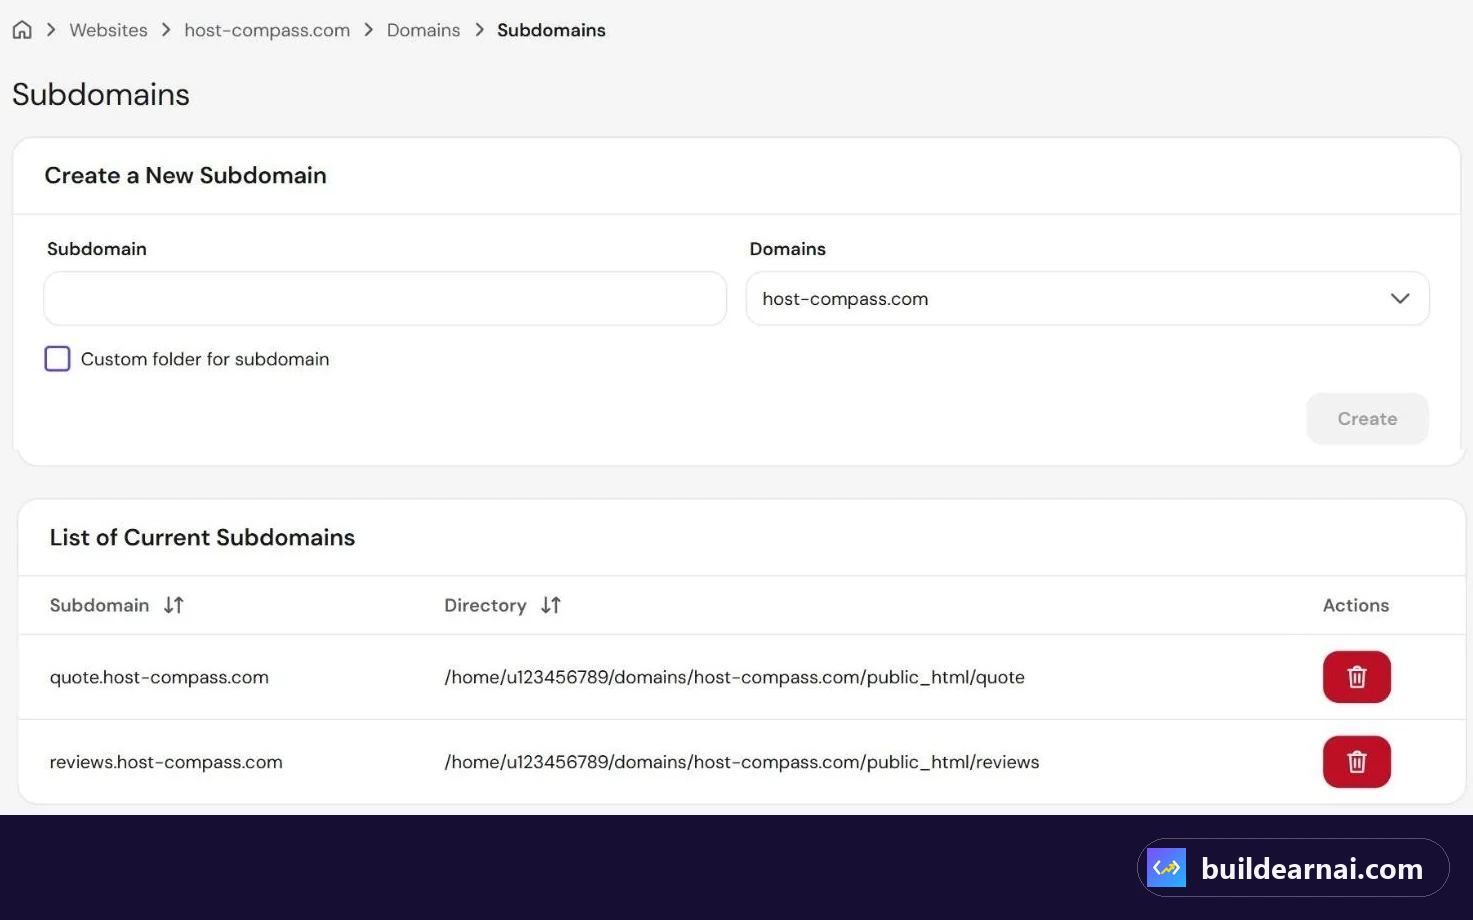
Creating the reviews subdomain in hPanel. Its files live in public_html/reviews.
Our subdomain used this directory:
public_html/reviews
That folder became the deployment location for ReviewBoost.
Using a subdomain is especially helpful if your main domain already runs WordPress or another website. It gives your PHP project a separate location and reduces the chance of accidentally overwriting your existing site's files.
A subdomain is not a complete security boundary, though. The application still needs proper access controls and secure configuration.
For your own project, use the actual folder assigned by hPanel rather than assuming every hosting account follows the same directory structure.
Step 2: Create a MySQL Database and User
ReviewBoost needs a database to store application information and customer feedback. We created a MySQL database through Hostinger's control panel.
- In hPanel, open Databases > Management.
- Create a new MySQL database.
- Create the database user and enter a strong password.
- Save the complete database name and username.
- Keep the password private. You'll enter it during installation.
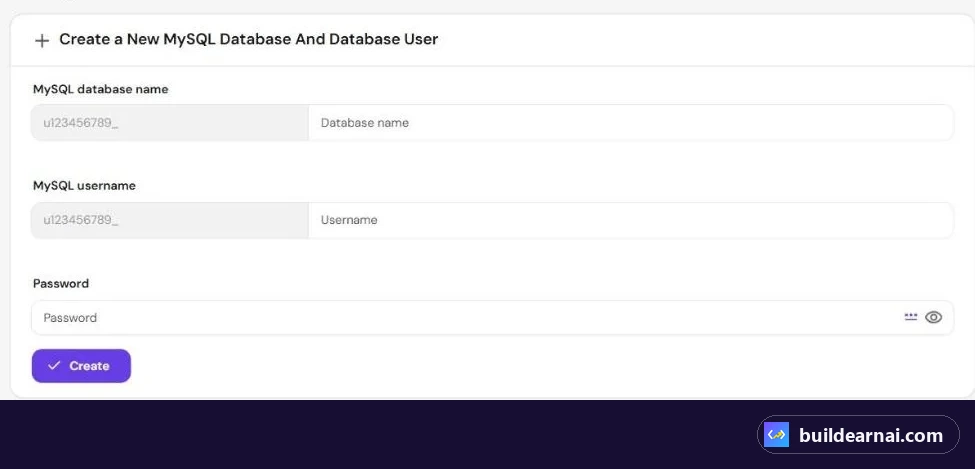
The database form in hPanel. Hostinger adds your account prefix to the name and user.
Don't Forget the Database Prefix
Hostinger adds an account-specific prefix to database names and usernames. A name you choose may become something like:
u123456789_reviewboost
The database username may have a similar prefix.
The example above is illustrative. Use the exact values displayed in your own hosting account.
One common mistake is entering only the short name instead of the full database name. That can cause the connection to fail even when your password is correct.
For ReviewBoost, the database host entered in the installer was localhost.
Important: Don't paste your real database password into an AI chat, public repository, tutorial screenshot, or support forum. Enter it yourself directly in the installer.
No hosting yet? You can follow these steps on any Hostinger shared plan; the database screen is the same on Premium, Unlimited and Business.
Step 3: Upload the PHP App to Shared Hosting
With the database ready, the next task was uploading our PHP files to the correct directory.
- Open Hostinger's File Manager.
- Navigate to
public_html/reviews. - Upload the six ReviewBoost files.
- Verify that all filenames and extensions are correct.
- Confirm that
.htaccesswas uploaded, since files beginning with a dot may be hidden in some file managers.
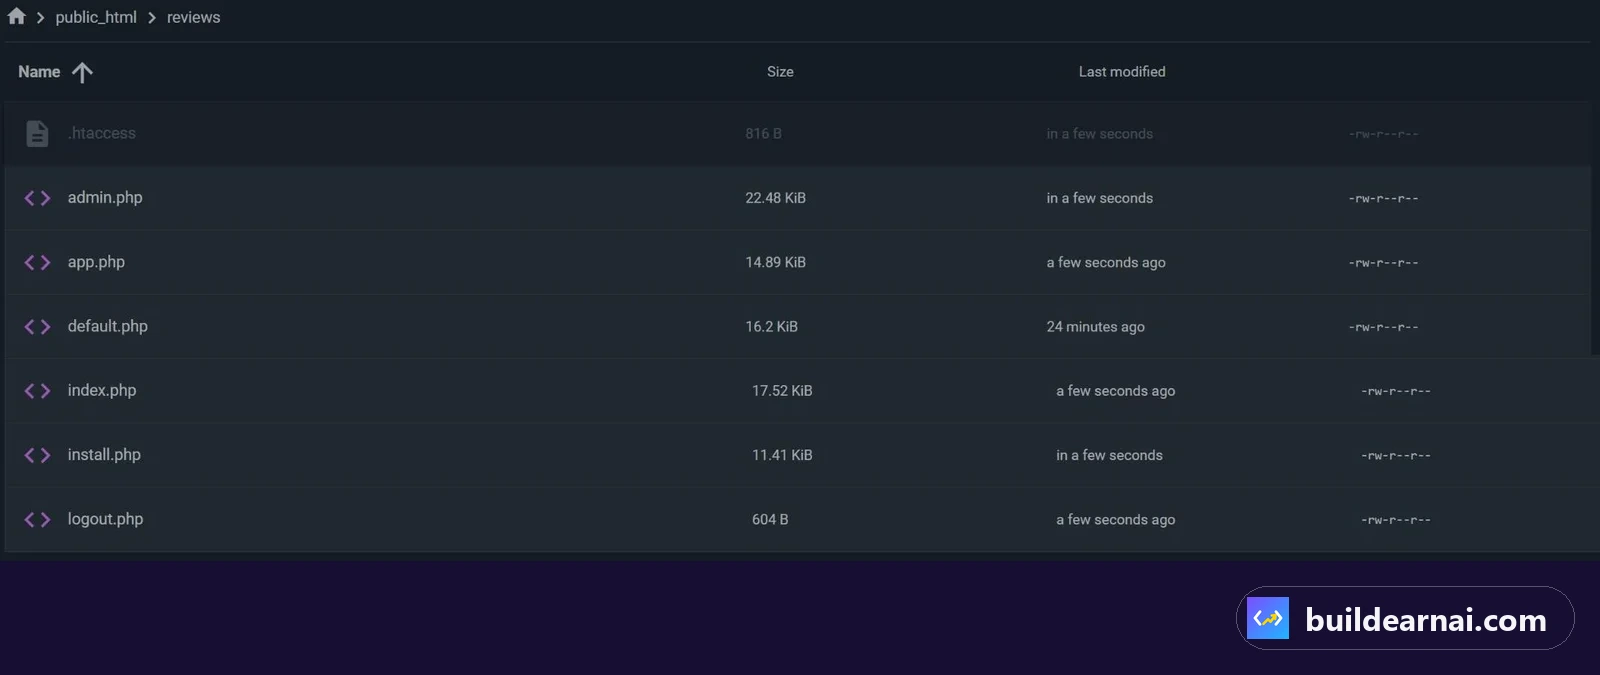
The six ReviewBoost files uploaded to public_html/reviews.
We found an existing Hostinger placeholder file named default.php in the folder. Our application also contained index.php, which took priority when opening the subdomain.
You don't need to replace your main website's files to host PHP app on Hostinger. Uploading to the subdomain's assigned directory keeps the project organized.
Check the Directory Structure
For our deployment, the PHP files sat directly inside public_html/reviews.
Watch out for accidentally uploading an extra project folder. For example, if index.php ends up in public_html/reviews/ReviewBoost, the subdomain's root URL won't necessarily load it.
Also, avoid uploading temporary database exports, old configuration backups, or unrelated development files into a publicly accessible folder.
Step 4: Run the Web Installer
ReviewBoost includes a web installer, so we didn't need to manually edit database connection details inside PHP code after uploading.
We opened install.php through the subdomain URL in our browser.
The installation process had two stages.
Installer Stage 1: Database Connection
We entered the following details:
- Database host:
localhost - Database name: The full name from hPanel, including its prefix.
- Database username: The full username from hPanel.
- Database password: The password entered when creating the user.
Be careful when copying database values. An incorrect username, missing prefix, or wrong password can prevent the installation from connecting.
Installer Stage 2: Business Settings
The second stage asked for:
- Business name.
- Google review link.
- Administrator email address.
- Administrator password.
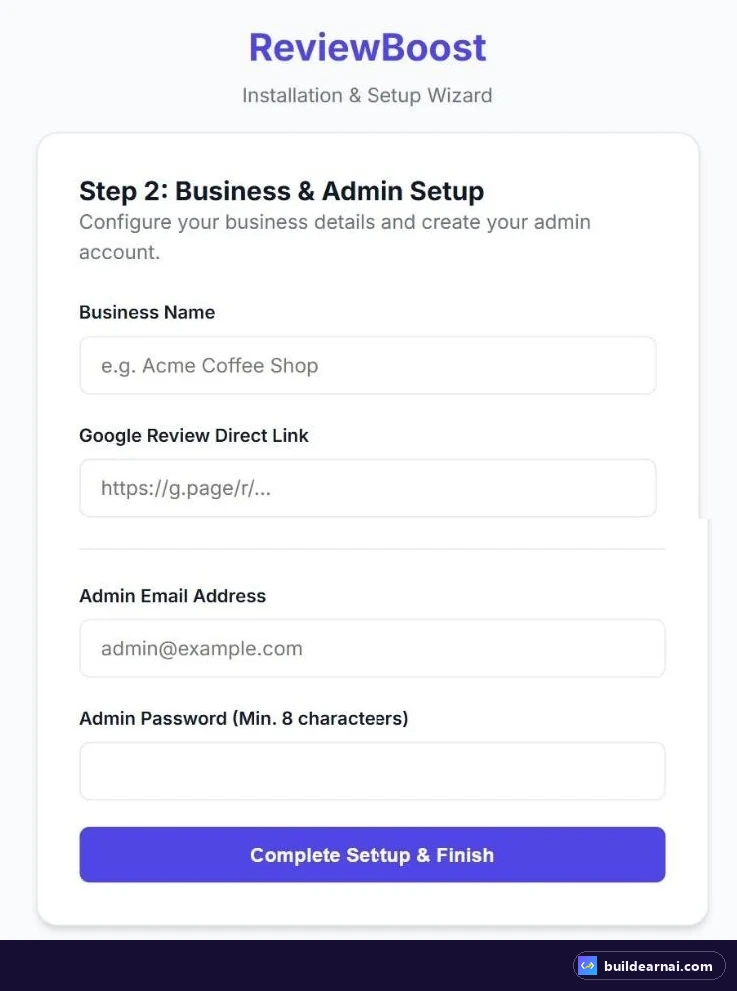
Installer stage 2: business details and the admin account.
After we submitted the information, the installer wrote the application configuration and displayed Installed Successfully.
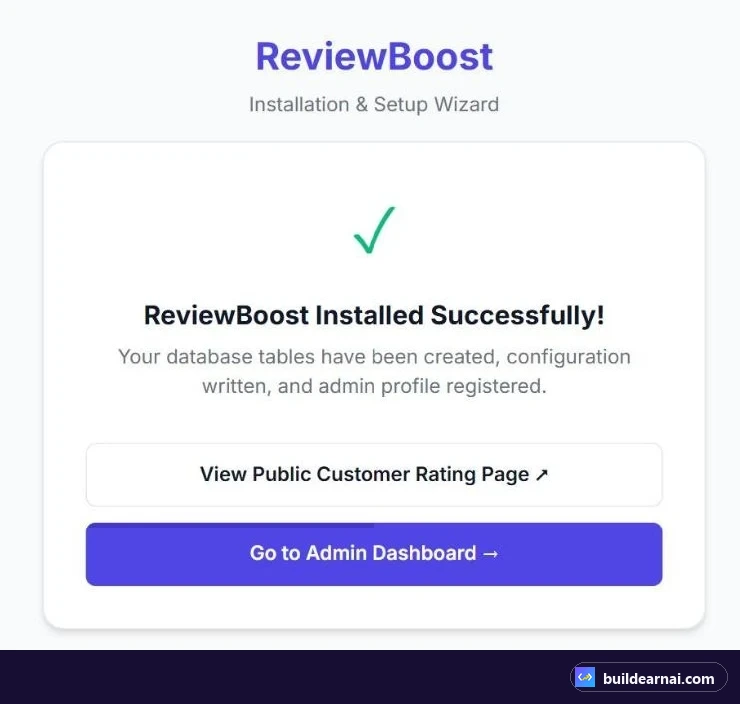
The installer creates the tables, writes the configuration and registers the admin.
The generated config.php contains application configuration, so protecting it from direct browser access is essential.
Not every PHP application has an installer. If yours doesn't, you'll need to follow its database import and configuration instructions instead.
Test the Live App Before Sharing It
A successful installation message is a good sign, but it doesn't guarantee that the customer experience works correctly.
We opened ReviewBoost on a phone-sized screen and tried different ratings.
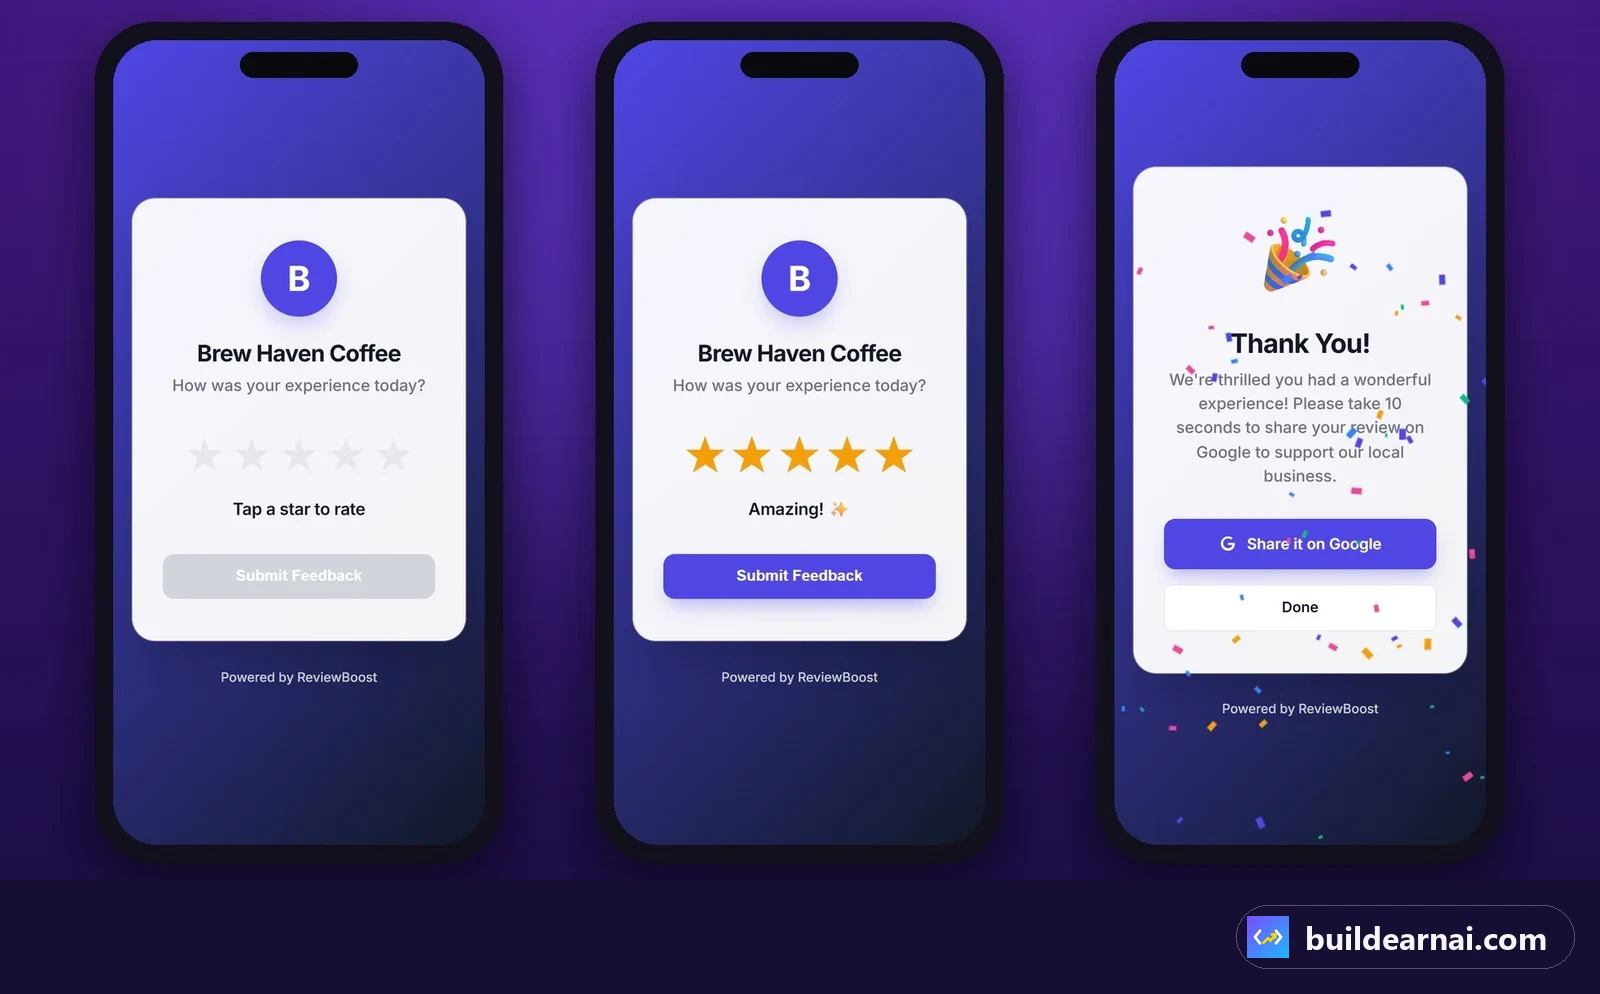
The live app: the rating screen and what customers see after rating.
When we selected 5 stars, the app displayed a thank-you screen with confetti and a Share it on Google button.
When we selected 2 stars, it displayed the optional private feedback form. After submitting feedback, we reached a Feedback Received confirmation.
We also made an important change to the review flow.
Avoid Google Review Gating
Google prohibits review gating, where businesses selectively encourage only satisfied customers to post public reviews.
Our app therefore makes the Google review option available to every customer, regardless of star rating. Customers who select a low rating can still leave a Google review. The private feedback form is optional, not a replacement for the public review option.
This distinction matters if you're building a similar tool for clients. Don't design a flow that sends happy customers to Google while hiding the public review option from unhappy customers.
Security Checklist Before You Share the Link
Getting your app online is only half the job. Before giving the URL to customers, verify that sensitive files and administrative features are protected.
Here are the checks we performed on ReviewBoost:
| Security check | Why it matters | How we tested |
|---|---|---|
Block direct access to config.php | The configuration contains sensitive application settings. | We opened the file URL directly and received 403 Forbidden, enforced by .htaccess. |
| Lock the installer after setup | An exposed installer could allow unwanted reconfiguration. | We reopened install.php and received Installation is locked. |
| Use PDO prepared statements | Prepared statements protect database queries against SQL injection when used correctly (PHP docs). | We checked that the application's database queries use PDO prepared statements. |
| Hash the administrator password | Passwords should not be stored as readable plaintext. | We checked that the application stores the administrator password as a hash. |
These checks are important, but they are not a full security audit. Before production use, also verify HTTPS, validate user input, protect authenticated actions against CSRF, and check session handling and access permissions.
Keep the installer disabled after setup. For applications that don't need to retain an installer, removing it can provide additional protection.
Common PHP Hosting Errors and Fixes
AI-generated code can contain small mistakes that prevent the whole app from running. We encountered three specific problems during our build, and there are a few other common shared-hosting issues worth knowing.
| Error or symptom | Likely cause | How to fix it |
|---|---|---|
Code in install.php doesn't execute correctly | Gemini's copy button merged two lines, leaving a required line inside a comment. | Open the file in a code editor, separate the lines, inspect the comment, and run php -l install.php. |
PHP error involving $e::getMessage() | Incorrect syntax for calling the exception object's method. | Change it to $e->getMessage() and retest. |
PHP 8.4 deprecation notice from fputcsv() | The escape parameter was omitted. | Supply the escape argument explicitly, for example fputcsv($handle, $row, ',', '"', ''), where an empty escape value disables PHP's proprietary escaping behavior. |
| HTTP 500 Internal Server Error | A PHP syntax error, incompatible PHP version, or server configuration problem. | Check PHP error logs, run php -l on the affected file, and verify that the hosting PHP version is compatible with your code. |
| Database connection refused or authentication failed | Incorrect database host, username, password, or missing account prefix. | Compare the exact database credentials with hPanel. Use the database host provided by your hosting service; ours was localhost. |
| 403 Forbidden when opening the app folder | The directory has no usable index file, directory listing is disabled, or access rules block the request. | Confirm that index.php exists in the correct folder. If it does, inspect file permissions and Apache rules without disabling security protections. |
If something fails, change one thing at a time and test again. Avoid asking AI to rewrite the entire app for a single error. A targeted correction is easier to review and less likely to introduce unrelated problems.
Shared Hosting or VPS: Which Should You Choose?
For a small PHP + MySQL app like ReviewBoost, shared hosting is a reasonable starting point.
Our app uses PHP files and a MySQL database. It doesn't require a continuously running Node.js application or a dedicated server process.
A VPS becomes more appropriate when your project needs capabilities such as:
- Running a persistent Node.js backend or an automation tool like n8n (see how we installed n8n on a Hostinger VPS).
- Managing background workers or long-running processes.
- Root access and custom server configuration.
- More control over server resources and installed software.
A VPS also brings extra responsibility for server setup, security, maintenance, and monitoring. It isn't automatically the better choice for every app.
Before purchasing hosting, check the application's actual runtime requirements and your plan's supported PHP versions, database access, and resource limits.
Also consider the long-term cost. Our Hostinger renewal prices guide explains why renewal pricing deserves attention when planning recurring expenses.
👉 Start on Hostinger shared hosting, or choose a Hostinger VPS if your app needs Node.js, background workers or root access.
How to Make Money With an App Like ReviewBoost
Once you can build and deploy a working app, you can turn that technical skill into a service for local businesses.
For example, a shop, salon, or restaurant might want a branded QR code that customers can scan to leave reviews or send feedback privately.
One possible pricing model is:
- $300 one-time setup: Configure the application, branding, review link, and deployment.
- $29 per month: Provide an agreed ongoing service, such as maintenance, support, or hosting management.
These are illustrative prices, not guaranteed selling prices or earnings. Actual demand, costs, support workload, and what clients are willing to pay will vary.
Be clear about what the monthly fee covers. Don't promise unlimited support or results you can't control.
Most importantly, sell the tool and the service, not a promise of positive Google reviews. You cannot guarantee that customers will leave reviews or that those reviews will be favorable.
Frequently Asked Questions
1. Can I host a PHP + MySQL app on Hostinger shared hosting?
Yes. We deployed ReviewBoost on Hostinger Business shared hosting using hPanel, File Manager, and a MySQL database. The same general steps apply to the Premium and Unlimited plans in this test. Check your application's PHP and database requirements before choosing a plan.
2. Do I need a VPS to run an AI-generated PHP app?
Not necessarily. What matters is the application's technical requirements, not whether AI wrote the code. A small app using ordinary PHP requests and MySQL can work on compatible shared hosting. Apps requiring persistent server processes or custom system-level software may need a VPS.
3. Why does my PHP app work locally but fail after uploading?
Your local and hosting environments may use different PHP versions, database credentials, directory paths, or server rules. Start with PHP error logs and php -l. Then verify the uploaded files, database settings, and hosting PHP version. Don't assume the database credentials from your local MariaDB setup will work on Hostinger.
4. Is an AI-generated PHP application safe to sell to clients?
Not automatically. AI-generated code still needs syntax checks, functional testing, security review, and ongoing maintenance. Our ReviewBoost deployment passed the specific checks described above, but those checks do not establish that every possible vulnerability has been eliminated. Review the code and its dependencies carefully before handling real customer data.
Final Thoughts
Learning how to upload a PHP app to shared hosting is a practical skill if you're building websites or small business tools with AI.
Our ReviewBoost experience showed that the deployment itself can be straightforward: create a subdomain, create the database, upload the files, and run the installer. The more important work is testing the generated code, correcting errors, protecting sensitive information, and checking the real customer experience.
If you'd like to see the complete project rather than just the hosting steps, watch how we built ReviewBoost using free AI and prepared it for deployment.
Build something small, test it properly, deploy it carefully, and improve it before asking anyone to pay for it.
Need hosting for a project like this? We used a Hostinger shared plan with PHP 8, MySQL and a free SSL certificate. See Hostinger's current plans →
Affiliate link: we may earn a commission at no extra cost to you. It does not change our tests or numbers.